详解Python使用OpenCV如何确定一个对象的方向
时间:2022-10-28 10:07:30
在本教程中,我们将构建一个程序,该程序可以使用流行的计算机视觉库 OpenCV 确定对象的方向(即以度为单位的旋转角度)。
最常见的现实世界用例之一是当您想要开发机械臂的取放系统时。确定一个物体在传送带上的方向是确定合适的抓取、捡起物体并将其放置在另一个位置的关键。
1.代码实现
接受一个名为input_img.jpg的图像,并输出一个名为output_img.jpg的带标记的图像。部分代码来自官方的OpenCV实现。
import cv2 as cv
from math import atan2, cos, sin, sqrt, pi
import numpy as np

def drawAxis(img, p_, q_, color, scale):
  p = list(p_)
  q = list(q_)

  ## [visualization1]
  angle = atan2(p[1] - q[1], p[0] - q[0]) # angle in radians
  hypotenuse = sqrt((p[1] - q[1]) * (p[1] - q[1]) + (p[0] - q[0]) * (p[0] - q[0]))

  # Here we lengthen the arrow by a factor of scale
  q[0] = p[0] - scale * hypotenuse * cos(angle)
  q[1] = p[1] - scale * hypotenuse * sin(angle)
  cv.line(img, (int(p[0]), int(p[1])), (int(q[0]), int(q[1])), color, 3, cv.LINE_AA)

  # create the arrow hooks
  p[0] = q[0] + 9 * cos(angle + pi / 4)
  p[1] = q[1] + 9 * sin(angle + pi / 4)
  cv.line(img, (int(p[0]), int(p[1])), (int(q[0]), int(q[1])), color, 3, cv.LINE_AA)

  p[0] = q[0] + 9 * cos(angle - pi / 4)
  p[1] = q[1] + 9 * sin(angle - pi / 4)
  cv.line(img, (int(p[0]), int(p[1])), (int(q[0]), int(q[1])), color, 3, cv.LINE_AA)
  ## [visualization1]

def getOrientation(pts, img):
  ## [pca]
  # Construct a buffer used by the pca analysis
  sz = len(pts)
  data_pts = np.empty((sz, 2), dtype=np.float64)
  for i in range(data_pts.shape[0]):
data_pts[i,0] = pts[i,0,0]
data_pts[i,1] = pts[i,0,1]

  # Perform PCA analysis
  mean = np.empty((0))
  mean, eigenvectors, eigenvalues = cv.PCACompute2(data_pts, mean)

  # Store the center of the object
  cntr = (int(mean[0,0]), int(mean[0,1]))
  ## [pca]

  ## [visualization]
  # Draw the principal components
  cv.circle(img, cntr, 3, (255, 0, 255), 2)
  p1 = (cntr[0] + 0.02 * eigenvectors[0,0] * eigenvalues[0,0], cntr[1] + 0.02 * eigenvectors[0,1] * eigenvalues[0,0])
  p2 = (cntr[0] - 0.02 * eigenvectors[1,0] * eigenvalues[1,0], cntr[1] - 0.02 * eigenvectors[1,1] * eigenvalues[1,0])
  drawAxis(img, cntr, p1, (255, 255, 0), 1)
  drawAxis(img, cntr, p2, (0, 0, 255), 5)

  angle = atan2(eigenvectors[0,1], eigenvectors[0,0]) # orientation in radians
  ## [visualization]

  # Label with the rotation angle
  label = "  Rotation Angle: " + str(-int(np.rad2deg(angle)) - 90) + " degrees"
  textbox = cv.rectangle(img, (cntr[0], cntr[1]-25), (cntr[0] + 250, cntr[1] + 10), (255,255,255), -1)
  cv.putText(img, label, (cntr[0], cntr[1]), cv.FONT_HERSHEY_SIMPLEX, 0.5, (0,0,0), 1, cv.LINE_AA)

  return angle

# Load the image
img = cv.imread("input_img.jpg")

# Was the image there?
if img is None:
  print("Error: File not found")
  exit(0)

cv.imshow('Input Image', img)

# Convert image to grayscale
gray = cv.cvtColor(img, cv.COLOR_BGR2GRAY)

# Convert image to binary
_, bw = cv.threshold(gray, 50, 255, cv.THRESH_BINARY | cv.THRESH_OTSU)

# Find all the contours in the thresholded image
contours, _ = cv.findContours(bw, cv.RETR_LIST, cv.CHAIN_APPROX_NONE)

for i, c in enumerate(contours):

  # Calculate the area of each contour
  area = cv.contourArea(c)

  # Ignore contours that are too small or too large
  if area < 3700 or 100000 < area:
continue

  # Draw each contour only for visualisation purposes
  cv.drawContours(img, contours, i, (0, 0, 255), 2)

  # Find the orientation of each shape
  getOrientation(c, img)

cv.imshow('Output Image', img)
cv.waitKey(0)
cv.destroyAllWindows()

# Save the output image to the current directory
cv.imwrite("output_img.jpg", img)
2.输出图像
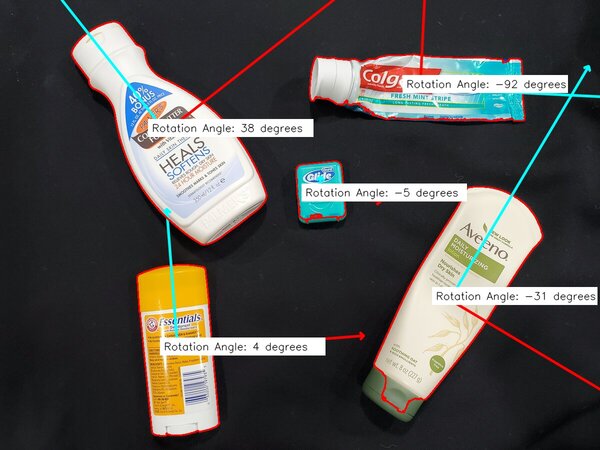
3.了解坐标轴
红线表示每个物体的正x轴。蓝线表示每个物体的正y轴。
全局正x轴从左到右横贯图像。整体正z轴指向这一页外。全局正y轴从图像的底部垂直指向图像的顶部。
使用右手法则来测量旋转,你将你的四个手指(食指到小指)笔直地指向全局正x轴的方向。

然后逆时针旋转四个手指90度。指尖指向y轴正方向,大拇指指向纸外z轴正方向。

4.计算0到180度之间的方向
如果我们想计算一个对象的方向,并确保结果总是在0到180度之间,我们可以使用以下代码:
# This programs calculates the orientation of an object.
# The input is an image, and the output is an annotated image
# with the angle of otientation for each object (0 to 180 degrees)

import cv2 as cv
from math import atan2, cos, sin, sqrt, pi
import numpy as np

# Load the image
img = cv.imread("input_img.jpg")

# Was the image there?
if img is None:
  print("Error: File not found")
  exit(0)

cv.imshow('Input Image', img)

# Convert image to grayscale
gray = cv.cvtColor(img, cv.COLOR_BGR2GRAY)

# Convert image to binary
_, bw = cv.threshold(gray, 50, 255, cv.THRESH_BINARY | cv.THRESH_OTSU)

# Find all the contours in the thresholded image
contours, _ = cv.findContours(bw, cv.RETR_LIST, cv.CHAIN_APPROX_NONE)

for i, c in enumerate(contours):

  # Calculate the area of each contour
  area = cv.contourArea(c)

  # Ignore contours that are too small or too large
  if area < 3700 or 100000 < area:
continue

  # cv.minAreaRect returns:
  # (center(x, y), (width, height), angle of rotation) = cv2.minAreaRect(c)
  rect = cv.minAreaRect(c)
  box = cv.boxPoints(rect)
  box = np.int0(box)

  # Retrieve the key parameters of the rotated bounding box
  center = (int(rect[0][0]),int(rect[0][1]))
  width = int(rect[1][0])
  height = int(rect[1][1])
  angle = int(rect[2])


  if width < height:
angle = 90 - angle
  else:
angle = -angle

  label = "  Rotation Angle: " + str(angle) + " degrees"
  textbox = cv.rectangle(img, (center[0]-35, center[1]-25),
(center[0] + 295, center[1] + 10), (255,255,255), -1)
  cv.putText(img, label, (center[0]-50, center[1]),
cv.FONT_HERSHEY_SIMPLEX, 0.7, (0,0,0), 1, cv.LINE_AA)
  cv.drawContours(img,[box],0,(0,0,255),2)

cv.imshow('Output Image', img)
cv.waitKey(0)
cv.destroyAllWindows()

# Save the output image to the current directory
cv.imwrite("min_area_rec_output.jpg", img)